Showing posts with label bathroom. Show all posts

Friday, February 19, 2010

Guest Bathroom Facelift: Part 4.. The Reveal

TA-DA


She's finally done!

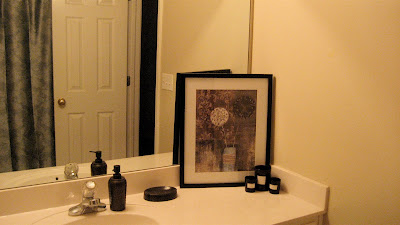
You are all now officially invited to come over and inspect our loo..

(click on the picture to see close-ups.. safe to say I am loving my new camera)


A few things..
I spray painted the cabinet knobs with brushed nickel to match our light fixture. Easy fix, but took me a solid 2 weeks with our little cold snap. I found the white shower mat at Target on clearance for 6 buckaroos. Score! My good friend S gave me the linen-look fabric for my DIY shower curtain. Total score. And yes, I used curtain clips to attach it to the rod. I'm loving the fullness of the curtain in there.


Visit Part 1 to see befores of our guest bathroom.

Sunday, January 24, 2010

Guest Bathroom Facelift: Part 3


Mirror, mirror on the wall, who's the fairest of them all?

I'm happy to say, my guest bathroom mirror, that's who!!

GB Facelift: Part 1
GB Facelift: Part 2


Like many newer houses, ours has the builder-grade mirrors in the bathrooms, with their flat, lifeless edges making no real impact or statement in the room, other than their sheer size and reflection of every single thing in there. That just wasn't going to cut it with me. I had long ago decided that I would buy a large, framed mirror to replace the old one.


The problem was, this mirror spanned from wall to wall across the counter, which is just under 5 feet long. A mirror that size was going to be pricey, and we all know I like to cut corners, save money and DO IT MYSELF. After coming across this bathroom mirror DIY frame, I knew I could make it happen, for a fraction of the price. Insert problem #2: we don't have a saw, and the lovely fellows at Home Depot will only do so many complimentary cuts for you. So instead of having the normal, angled corners (can't think of the correct term), we stuck with straight edges to our 1x4's and came up with a plan.

Here's how it all went down:
1. I measured.
2. I drew out a little diagram to get an idea of scale and how it would all look.
3. Measured again.
4. Determined what length we needed our 1x4's.
5. Jaunt over to Home Depot during the lunch hour to purchase the wood and some Liquid Nails. (That stuff is hard core).
6. Stain the wood. This took numerous coats. I decided (foolishly), to start staining a day before the huge snow storm hit us around Christmas. So the first few coats really didn't have a chance to dry since the temperature in the garage didn't venture above about 10 degrees. I ended up bringing them into the guest room to finish staining and give them a coat of poly.
7. Install!

I started by placing the pieces against the mirror and taping them in place with painters tape to make sure everything fit correctly and evenly. Then we broke out the Liquid Nails and got to work!

You can kind of see our "design" for the corners below. I keep trying to type out a description and then delete it, because it doesn't make sense. So if you don't get it, just come over and look for yourself. :)

I wanted the stain to be a deep, dark mahogany, so I did about 5 or 6 coats. I love how the color turned out and the contrast it creates with the countertop and our new paint.


See, this is what I mean about reflecting everything in the room. I tried and tried to get a shot of the whole frame, without including my sweats-wearing self in the photo. Not going to happen.


Doesn't it instantly change the room? If I were only going to do one update to the bathroom, this would be it. It just gives it a custom look. I love it!

____________________

On a totally unrelated note, one day after submitting myself to Jillian Michael's Shred mercy, I am feeling the burn. It would be untruthful to say I even experienced the full force of her fury, since at least a third of the time, I was blatantly ignoring her commands and doing whatever exercises/movements I wanted. If you do the math on that, it's really laughable, since the video is only 20 minutes long. But we jogged beforehand and then jumped right into level 2, so that has to count for something! My two friends who did the video with me were much more obedient and didn't deviate from her instructions and I'm sure will have thinner thighs than I because of it.

WHATEV.

Have you tried the 30 Day Shred?? Did you actually make it 30 days? We just started getting together every Saturday morning to submit ourselves to torture in the eternal search of a toned physique, so we should be done by around September. Check back with me then and I'll give a full, detailed report.

Wednesday, January 20, 2010

Guest Bathroom Facelift: Part 2

Next up in my little Guest Bathroom Facelift, is the artwork. Because what powder room would be complete without some fancy-shmancy DIY art on the walls?

To read the eternally exciting GB Facelift: Part 1, scroll down or click here.


Step One. Find some random art pieces on clearance at TJ Maxx. These babies fit the bill:


Step Two. Lurk around in bloggy-land and find yourself some inspiration. I've always loved the work of this talented lady. (She's even doing her own bathroom makeover right now. Ack! Pressure!) I especially love this and this. Both are on my project to-do list, especially since she has been so kind as to offer up step by step instructions!!

I also came across a PB canvas piece a long time ago that was very graphic and used only numbers, which is ultimately what I went for..


Step Three. ¡De Colores! :) I couldn't resist. Translation: I painted. I had to do multiple coats to cover up the old artwork and just mixed my own formula of paint with both acrylic craft and interior wall paint. I'm sure that's against some sort of artistic rule, but I'm not losing any sleep over it.


Step Four. Print off some numbers in varying sizes, cut them out and lightly trace onto your art piece. Then paint some more. I decided to personalize it a bit by adding our wedding date: 5.3.08.


Step Five. Hang the pictures and then turn 180 degrees and realize you need something on the opposite wall. Right. Now.

I picked up these Vintage Keys from Pottery Barn last fall. I wasn't sure how/where I was going to use them, but I loved them and for 19 bucks, I figured I could splurge and use one of my year and a half old wedding gift cards. So I did.


Step Six. Get crafty. I finally decided what I wanted to do, so I hit up the Goodwill and found 2 sets of matching frames with ugly pictures for a total of $8. I ditched everything but the frames and cardboard backing and once again broke out the paint. I decided to distress the frames by sanding the edges and giving them a little Ralph Lauren Smoke Glaze love, thanks to the inspiration of these ladies. Next comes burlap and the hot glue gun, and after about an hour and a couple of burned fingertips, I ended up with this:


Step Seven. Stand back and admire your handiwork. Go poke your husband in the ribs and nod in the general direction of the bathroom until he goes in there and checks it out and showers himself with praise for marrying a crafty lady.


THE END.

(Of Part 2)


Edited to add: I've linked up to A Soft Place to Land's DIY Day and Today's Creative Blog's Get Your Craft On! Go check out some other great projects!

Saturday, January 16, 2010

Guest Bathroom Facelift: Part 1


I am in the throes of giving our guest bathroom a thorough facelift, and thought I would share my progress in little nips and tucks.

Hehe. Get it? Nips and tucks? Nevermind.

So to get us started, I present you with the Before photos:


Lots of blah and white and blah and some blue in the shower curtain and rug. It was fine, I suppose, but I wanted some zest and spice in our Guest Loo, and that fake plant just wasn't cutting it. I only wish I could have shown you the rubber ducky border that went around the room when we first bought the house, because that really sauced it up. I may or may not have started peeling it off before we actually took possession of the property.. but that's neither here nor there.


So first up?

PAINT.

Pintura.

¡De Colores!


Yeah, yeah, I know that last one is a reach, but I couldn't resist throwing it in there. Hubby likes to exclaim "de colores" with a lot of gusto and sometimes exasperation/frustration/panache at random happenings in our household. Like if he thinks my outfit is particularly hotsy-totsy, or if the dog is driving him crazy.

We don't claim to be culturally correct.

But I digress..


PAINT.

I thought real long and hard about what color to go with and then settled on the can of free paint I scored from Glidden last fall. That free part just tipped me over the edge. Color of choice: Olivewood.


It's a nice, warm, neutral-y, olive color and I'm just tickled pink with how it turned out. Totally transforms the room. What do you think??

(I'm re-reading this, and sheesh, my photography skills are at an all time high. Could these pics be any more boring?? But I am trying to keep it to one little reveal at a time, thus the snore-fest pictures. Hang in there with me- I promise it will get better!)


Related Posts Plugin for WordPress, Blogger...